Connect On
Technology For Teachers
  • Home
  • Integrating Technology
    • 5 tools online tools
  • Creating Technology Rich Lessons
    • Getting Started >
      • Work Samples
    • Resources
    • Lesson Plans
    • Wrapping Things Up
  • Using MS Office
    • Google Suite
  • Technology Standards
    • Digital Citizenship
  • Productivity Tools For Education
    • Symbaloo >
      • Symbaloo Learning Paths >
        • Symbaloo Assignment
    • Screen O Matic
    • Dojo's
    • PowToons
    • StoryMaker
    • Story Jumper
    • Story Maker Apps Online
  • Missouri Learning Standards
  • Prezi's
  • Kahoot
  • Smart Notebook Tutorials
    • Smart Notebook Lessons
    • Smart Response Systems
    • Smart Notebook Templates
    • Assignment Requirements
  • Resources
  • Math Interactives
  • Fraction Resources
  • Teacher Web Pages
    • Web Page Requirements
    • Step by Step Directions >
      • Philosophy of Education
      • All About Me
    • Teacher Sites Review
    • Previous Teacher Web Sites Edu280
  • Great Links for Kids!
    • Student Interactive Sites
  • Storybook Makers
  • Pros and Cons Technology
  • practice
  • Wrapping Everything Up!
  • Symbaloo's
Get Started on Your Own Website Now!To begin, visit Weebly for Education.
Picture

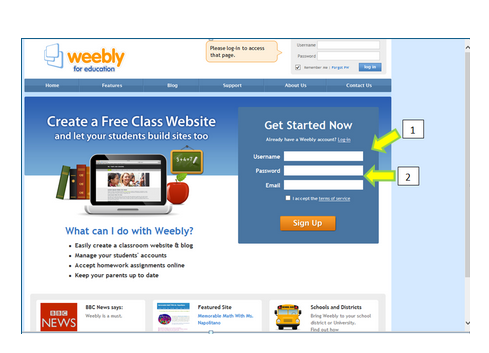
  1. Choose a user name. This is not the name of your website, just the name you will log in with to edit your site.
  2. Provide a password you will use to log in and your email address.
  3. Agree to the terms and you are on your way to having your own website!  
 Step-by-Step Directions From WeeblyThe experts at Weebly have put together a guide to walk you through the process with very easy to follow directions. You can follow the steps in order by clicking on the links below:

1. First StepsIn this section you will decide on your site and domain name, and select your design template from more than a hundred different choices along with fonts and colors.

  • Your site name and domain name do not need to be the same. The name at the top of my site says "Stevenson Stars"," and my domain name is stevensonj.net
  • When you create a free website with Weebly, you will have .weebly.com affixed to your domain name. (I eventually purchased my own domain name from another hosting site, so the .weebly isn’t there.)
  • Part of the fun of Weebly is that you aren’t stuck with a design once you choose it. You can quickly and easily switch themes and opt for a different template.
2. First Elements: Text  Elements are what you will drag and drop your information into. If I want to write a paragraph with a title and a picture, I simply choose the two elements, Title and Paragraph With Picture and drag them into the body of my website.

3. First Elements: PicturesYou can upload photos at any time from your computer or Weebly’s free database of photos. When adding images, do be careful of copyright infringement. While I always like to do things on the cheap side, getting a subscription makes your images legal. 

4. Edit Your HeaderThe header is the top of your website that normally includes pictures and text. You add photos and change fonts.

5. Change Font SettingsEvery theme has a default set of fonts that you can change if you like. Once you finish this step, you are ready to publish.

6. Publish Your SiteOnce you’re ready to share your work with the world, publish your site!


Powered by Create your own unique website with customizable templates.